
Curbless Shower Guide: What It Takes in an Existing Home
Planning a curbless shower? Learn how the floor is recessed, where linear drains go, how far waterproofing extends, and which Ontario permits may apply.
Key answer
A curbless shower is a floor project before it is a tile project
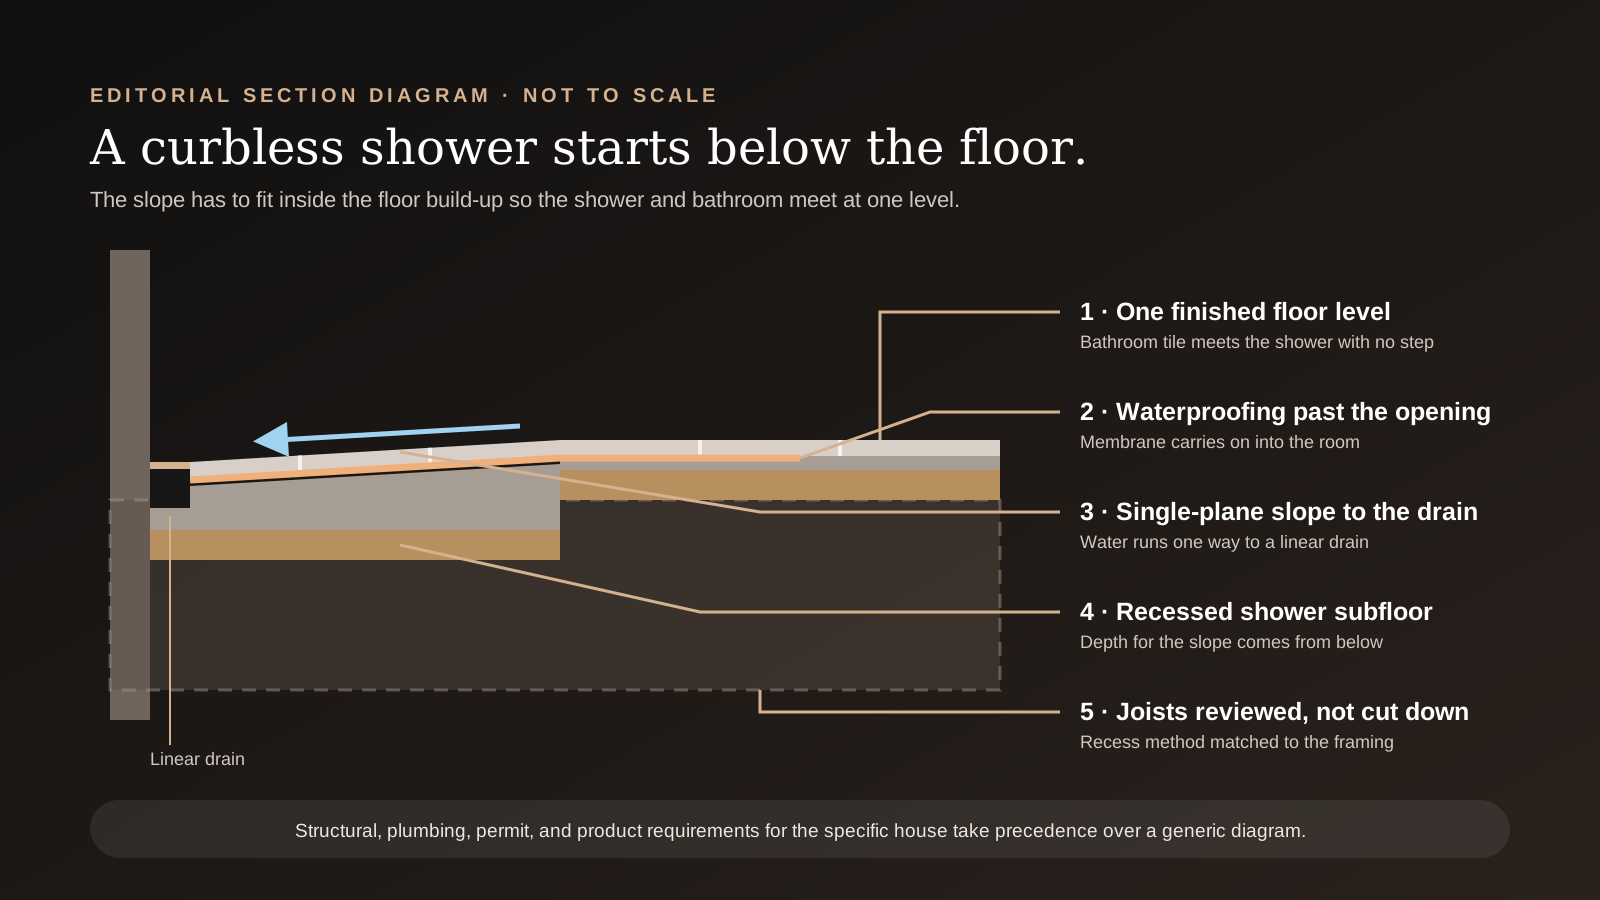
A curbless shower is possible in many existing homes, but the real work happens below the tile. The shower floor still has to slope to a drain, so that slope has to fit inside the floor itself: either the shower area is recessed, or the rest of the bathroom floor is raised to meet it. Then the waterproofing has to continue past the shower opening, because there is no curb to hold water back.
When those pieces are planned together, a curbless shower is one of the most rewarding bathroom upgrades. It looks open and calm, lets one floor tile run through the room, and removes the step that becomes a trip hazard as people age. When they are not planned together, it becomes a bathroom where water drifts toward the vanity.
This guide walks through the decisions in the order they need to be made. For how we approach shower projects in general, see our shower tile installation service.
Curbless, low-profile, and standard curb showers compared
| Shower entry | What it looks like | What it asks of the build |
|---|---|---|
| Standard curb | A raised, tiled curb at the entry holds water inside the shower. | The simplest to build over an existing floor, but the curb is a step into the shower. |
| Low-profile entry | A reduced curb or a gentle transition at the opening. | Less floor work than true curbless, with a small change in level at the entry. |
| True curbless | The bathroom floor and shower floor meet at the same height with no step. | A recessed or raised floor, a precise slope, usually a linear drain, and waterproofing beyond the shower. |
The right choice depends on the house as much as on style. A low-profile entry can be a smart compromise when the floor framing makes a full recess difficult, and it still reads as open and modern.
Where the slope comes from: recessing or raising the floor
Even with a thin prefabricated tray, a sloped shower floor needs depth. In a curbless design, that depth usually comes from lowering the subfloor in the shower area so the finished shower floor starts level with the bathroom floor and slopes down to the drain. Schluter describes recessing the shower subfloor as the way to create room for the sloped assembly while keeping the surrounding bathroom floor at its original height.
The alternative is to raise the rest of the bathroom floor to the height of the shower build-up. That can work in a full renovation, but it changes door thresholds, toilet flange height, vanity and counter heights, and the transition into the hallway.
In a wood-framed floor, how the recess is made matters a great deal. The Ontario Building Code only permits limited notches in floor joists: on the top edge, within half the joist depth of the bearing, and no deeper than one-third of the joist depth, unless the joist is made deeper. A shower recess usually sits mid-span, so the answer is not to cut the joists down. Options include manufacturer bracket systems that lower the subfloor between joists without cutting them, or new framing designed for the load.
Those systems have limits. Schluter's recessing brackets, for example, avoid cutting or notching joists but require joist spacing of no more than 19.2 inches on centre and create a recess of 11/16 inch. Which way the joists run, how far they span, and whether they are dimensional lumber or engineered I-joists all shape the approach. On a concrete basement slab, recessing means cutting out concrete around the drain and reworking the plumbing below, which is a different scope altogether.
Linear drain or centre drain in a curbless shower?
Most curbless designs use a linear drain because it lets the floor slope in one direction. Schluter notes that a linear drain can be installed against a wall or at intermediate locations, and that sloping to it on a single plane allows large-format tile to continue from the bathroom floor into the shower.
Linear drain at the back wall. The floor slopes away from the entry toward the far wall, so water moves away from the room and the entry stays level with the bathroom floor. It is a popular layout for exactly that reason.
Linear drain at the entry. A drain across the opening catches water before it reaches the bathroom. It can suit a tight room, but the shower floor then slopes toward the bathroom and the drain grate sits where people step.
Centre drain. A centre drain can still work, but its four-way slope has to blend into a flat bathroom floor at the opening, which usually means mosaic tile in the shower and more careful transitions. For how drain type affects tile, see our guide to the best tile for shower floors.
Waterproofing has to go past the shower opening
A curbed shower has a clear boundary. A curbless shower does not, so water travels farther than people expect: splash off a body, drips from a towel, or a film of water running along the floor when the drain is working hard. Schluter states that industry guidelines recommend waterproofing a minimum of 1 foot beyond the shower area in curbless showers, and recommends protecting the bathroom as a whole because wet and dry areas are not clearly defined.
In practice, many curbless bathrooms are waterproofed across a large part of the floor or the entire floor, with the membrane tied into the shower walls and the drain as one continuous system. Extra membrane on the bathroom floor is a modest addition next to the cost of repairing a soaked subfloor or the ceiling below.
Ask to see the waterproofing plan in writing: where the membrane starts and stops, how it connects to the drain, how seams and corners are treated, and when the assembly will be water-tested before tile. Our guide to tile waterproofing methods explains the membrane options.
Glass, shower size, and keeping water where it belongs
Without a curb, the layout of the shower does the work of containing water. A longer shower, a fixed glass panel, and a shower head aimed away from the opening all help keep spray inside the wet zone. A handheld shower is useful, especially for accessibility, but it also makes it easier to spray water into the room.
Glass should be planned with the floor, not after it. Fixed panels need solid attachment points and hardware that sits correctly where the floor begins to slope. A swinging door has to clear a floor that is not flat, so bring the glass supplier into the conversation before the tile layout is final.
Tile choices that suit a curbless floor
The appeal of a curbless shower is continuity, so many designs run the same large matte porcelain from the bathroom into the shower. That works best with a linear drain and a single-plane slope, so the larger tiles stay flat. Whatever tile you choose has to be rated for wet floor use and have a finish that gives grip when wet.
If you prefer a mosaic shower floor, a change in format at the shower zone can still look intentional when the colour or collection matches the main floor. Either way, align the tile layout with the drain and the glass line so the cuts land in logical places.
Heated floors pair well with curbless showers because a warm floor helps the wet area dry and keeps the whole room comfortable underfoot. Our article on whether heated floor tile is worth it covers the planning details.
Permits, plumbing, and electrical work in Ontario
A curbless shower usually moves or replaces the drain, and it may change the floor framing. Permit requirements are set by each municipality, so confirm the rules before work starts. The City of Kitchener, for example, lists adding or moving plumbing fixtures as work that needs a building permit, while tiling and similar finish work does not. Because changes to floor framing are structural, ask your building department whether your recess method needs a permit or an engineer's review.
Electric floor heating has its own rules in Ontario. The Electrical Safety Authority requires notification for in-floor heating cables and mats and an inspection before they are covered, and the electrical connection belongs with a Licensed Electrical Contractor.
A good tile installer will tell you which parts of the job belong to a plumber, an electrician, or a framer, and who is responsible for permits and inspections, before any demolition begins.
When a curbless shower makes sense, and when it fights the house
Curbless showers make the most sense when the bathroom is already being taken down to the framing, the floor structure allows a recess, and the design benefits from one continuous floor. They are especially worthwhile in main-floor and primary bathrooms where someone may later rely on a walker, a shower seat, or a wheelchair.
They are harder when the joists run the wrong direction or have already been cut for old plumbing, when the room sits over a finished ceiling nobody wants to open, or when the bathroom is too small to contain spray without a curb. In those cases, a low-profile entry often delivers most of the look with far less disruption.
Older homes across Waterloo Region often carry decades of past renovations, and framing under a bathroom may not match what anyone expects. Opening the floor is the only reliable way to know, which is why a curbless quote should explain what happens if the structure needs more work than planned.
Questions to ask before approving a curbless shower quote
Bring these questions to every installer you are comparing. Clear, specific answers are a good sign that the hidden work has been thought through.
- How will the shower area be recessed, and does the method require cutting or reframing any joists?
- Which drain type and location are planned, and why?
- How far will the waterproofing extend past the shower, and how does it connect to the drain?
- Will the shower be water-tested before tile goes on?
- How will finished floor heights line up with the hallway, toilet, and vanity?
- Who handles the plumbing, electrical, and any permits or inspections?
- How will the glass be attached where the floor slopes?
- What happens if opening the floor reveals damaged or altered framing?
What we recommend for a curbless shower in Waterloo Region
If you want a curbless shower, decide early. The recess, drain, and waterproofing have to be designed before demolition is finished, not added once tile is on site. Our usual recommendation is a linear drain with a single-plane slope, waterproofing well past the opening, and a matte porcelain floor that can run through the room.
Moonka Tiles Co. builds custom showers, including curbless and low-profile entries, with the prep and waterproofing planned before the first tile. Learn more about custom shower installation in Kitchener, Waterloo, Cambridge, and Guelph, or send us photos of your bathroom and a rough layout to find out what a curbless shower would involve in your home.
Frequently asked questions
Do curbless showers leak more than showers with a curb?
Not when the waterproofing is continuous and extends past the shower opening. The more common problem is water reaching the bathroom floor, which is managed with a correct slope, a well-placed drain, a sensible shower size, glass, and waterproofing beyond the shower.
Do you have to cut floor joists for a curbless shower?
Joists should not simply be cut down. The Ontario Building Code limits notches to the top edge near a bearing. Common approaches include bracket systems that lower the subfloor between joists without cutting them, or reframing designed for the load.
Does a curbless shower need a linear drain?
No, but a linear drain makes it much easier. It allows a single-plane slope, so larger tile can run from the bathroom into the shower. A centre drain can work, but it usually needs mosaic tile and more careful transitions at the entry.
Do you need a permit for a curbless shower in Ontario?
Often, yes. Moving a drain or adding a fixture can require a building permit, and floor framing changes are structural, while tiling on its own usually does not need one. Rules vary by municipality, so confirm with your local building department before work starts.
How far should waterproofing extend past a curbless shower?
Schluter cites industry guidelines of at least 1 foot beyond the shower area and recommends protecting the bathroom as a whole. Many designs waterproof most or all of the bathroom floor, tied into the shower walls and drain as one continuous system.
Sources and further reading
Technical claims are checked against the following primary or specialist references. Product-specific instructions always take precedence for the assembly being installed.
- Schluter Systems Canada: curbless shower systems and solutionsUsed for: Recessing the shower subfloor to fit the sloped assembly, industry guidance to waterproof at least 1 foot beyond a curbless shower, and protecting the bathroom as a whole.
- Schluter Systems Canada: KERDI-SHOWER-FRS floor recessing bracketsUsed for: An example of a manufacturer recess method that avoids cutting or notching joists, with stated limits such as joist spacing up to 19.2 inches on centre and an 11/16 inch recess.
- Schluter Systems Canada: showers with a linear drainUsed for: Linear drain placement against a wall or at intermediate floor locations, and single-plane shower floor slopes that allow large-format tile to continue from the bathroom floor.
- City of Markham Builder Tip: notching and drilling of framing membersUsed for: Ontario Building Code Article 9.23.5.2 limits on notching floor joists: on the top edge, within half the joist depth of the bearing, and no deeper than one-third of the joist depth.
- City of Kitchener: when you need a building permitUsed for: A local example of permit rules: adding or moving plumbing fixtures requires a permit, while tiling and similar finish work does not.
- Electrical Safety Authority: in-floor heating cable and mat bulletinUsed for: Ontario notification, inspection-before-covering, certification-mark, thermostat, sensor, and installation requirements for electric floor warming.